Showing posts with label Makeup. Show all posts

Sunday, 29 June 2014

Store your Beauty Products.


Here are some ways to organize your beauty products using things you probably already own. Who knew you could store your makeup products with kitchen items?

 
Display pretty fragrances on top of a cake stand.

Use a spice rack as a shelf for your perfume bottles. 

. Use the pouches on a hanging shoe organizer to store your hair products.


Tuesday, 23 April 2013

Tuesday, 2 April 2013

Order your Makeup Organizers and iPhone covers now!

Makeup organizers prices: Starting from 27 Rials, some are RO 13 , Others RO 7. 

Hurry up and order unique makeup and nailpolish organizers from smoothnsilky.

Follow her on instagram: smoothnsilky, 
or contact her on whatsapp for prices and more details! 92811809

Wednesday, 21 March 2012

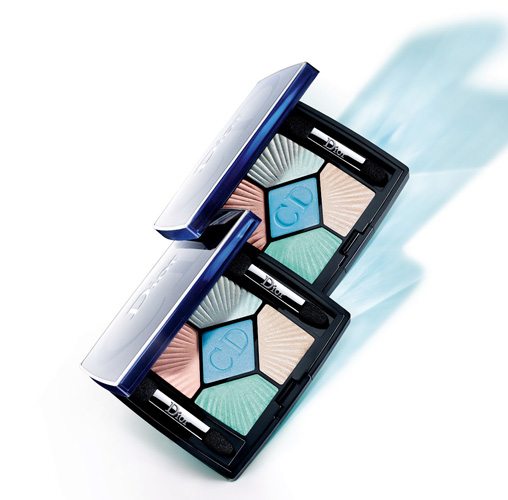
DIOR Croisette Makeup Collection for Summer 2012Makeup Collection for Summer 2012


The new season is filled with pleasant surprises as far as makeup goes as makeup designers have gone over-the-top with their creations. One of the collections that catches the eye this summer is the Christian Dior Croisette 2012 collection which has been inspired by the beauty of the French Riviera, so take a peek at the fresh and mesmerizing colored products featured in the collection and pick your new season favorites!   


5 Couleurs Croisette Eyeshadow Palette 


Divided in two groups, pastels and golden-bronze tones, the palettes can help you achieve both fresh, youthful makeup looks as well as sultry makeup styles, so select your best match from the following 5 color makeup palettes:
  • 224 Swimming Pool - warm blue/sand/nude pink tones
  • 654 Aurora - warm gold/bronze/brown tones


  • Couleur Eye Gloss 
    Featuring the first eye gloss signed Dior, the Croisette makeup collection dares you to resist its beauty. 

  • Tan
  • Seashell
  • Sunset
  • Azur


  • Nude Tan Glow Sun Powder
    Give your skin an irresistible sunkissed perfection using the label's fabulous Nude Tan Glow Sun Powder compacts. Available in six gorgeous hues, you can easily find the one that matches your skin tone perfectly, so choose from the following:
  • Honey
  • Amber
  • Cinnamon
  • Spicy
  • Toffee
  • Sienna


  •  Dior Addict Lip Balm
    Give your lips an infusion of moisture and a mouthwatering natural coloration using Dior's Addict Lip Balm in:
  • Crystal
  • Crystal Rose
  • Crystal Coral


  • Dior Vernis
  • Bikini - coral pink
  • Saint Tropez - turquoise


  • Wednesday, 25 January 2012

    Ladurée Makeup Line.

    The luxury French macaroon brand has announced the launch of a cosmetics range called Les Merveilleuses de Ladurée. Created in association with Albion Cosmetics, the collection will include 20 different blush colours in the form of cameos as well as liquid foundation and lip colours.


    Ladur%C3%A9e make up 468x311 Les Merveilleuses de Ladurée Makeup Line

    Ladur%C3%A9e face 468x311 Les Merveilleuses de Ladurée Makeup Line
    Ladur%C3%A9e cosmetics 468x311 Les Merveilleuses de Ladurée Makeup Line

    The collection is set to launch in Japan in February, before hitting Europe in Fall 2012, followed by the US and elsewhere in Asia.

    Friday, 25 November 2011

    MAKEUP Forever products.

    Those 3 makeup items, I spent god knows how much on! but guess what? I use none of them except for the HD powder which is doing a good job so far!
    The Mat Velvet Foundation did a good job too,and has great coverage but I found it too heavy for college espically at morning, It feels too cakey so I stopped using it.
    On the other hand, the primer is another story. I decided to use it for parties,weddings only cause It adds an instant shine which may look a bit too much for a normal outing! but I'll have to say,the only thing I wasn't convinced about was the HD powder,Wrong. I use it everyday I put on makeup,it reduces the pores and gives you a va-va-voom touch up. I can't really explain how this works. It just finishes off the look, and it's just one translucent shade that works on everyone.

    Karl Lagerfeld Makeup Collection for Sephora


    Sunday, 9 October 2011

    How to Apply Liquid Foundation.

    How to apply liquid foundation

    Liquid foundation is one of the ficklest products to apply. Ever. Not only is its basic application a chore, but even after you feel like you have a routine down, the smallest hiccup — anything from product buildup on your brush to a stray brush stroke — can throw off your entire look for the rest of the day.

    1. Grab your favorite liquid foundation

    Grab your favorite liquid foundation. Now, I almost always choose a full coverage one, as this method will sheer it down a bit, making it suitable for most skin types and needs. Pour or pump an amount about the size of a nickel or quarter (this will vary depending on the condition of your skin) onto the back of your hand or a palette.

    2. Take a dense, flat-top brush

    Take a dense, flat top brush , and dip it into the foundation. Dot this onto your nose, the cheeks, around the borders of your face, and your chin (one “dip” should pick up enough product to lightly dot around all of these areas).

    3. Starting at the nose…

    Starting at the nose, stipple in small, tight areas, moving to the cheeks and the borders of the face, stippling product inward towards the center. Repeat this process for your chin.


    4. With what is left on the brush…

    With what is left on the brush, stipple over the area above your lips and below your mouth. Avoid the area where you get smile lines for now (this will look weird, but we’ll correct this malfeasance later.


    5. If you regularly use foundation under your eyes…

    This next step is only if you regularly use foundation under your eyes, rather than or in conjunction with concealer. If you don’t, skip to the next step. Take a bit of foundation on the outer edge of your brush, and dot lightly under the eyes, concentrating the product at the lower inner corners where your undereyes are darkest. Stipple lightly over this area, taking the foundation applied under the eyes up and onto the eyelid and brow bone.

    6. Stipple across your forehead and into the hairline

    You should have about 1/3 of the product left. Take some on your brush, and stipple it across your forehead and into the hairline (almost as bad as the jawline is a blatant change in color at your hairline, which many people tend to neglect). Your entire face should now be covered (except for the small area around your smile lines).


    7. Dot under your jawline

    Take the remainder of the product on your brush, and dot it under your jawline. Stipple this upwards to “connect” with the product on your face, and downwards slightly to fade it into your neck. Stipple lightly where your ears connect to your face.


    8. Stipple all over your face

    Stipple all over your face, using any excess product to deal with problem areas. This distributes the foundation evenly. You may now go over your smile line area, which will only be covered with a small amount of product, greatly reducing the chance of creasing.


    9. Buff in a circular motion

    After you have stippled all over your entire face once, lightly buff in small circular motions using the same brush. This blurs imperfections and removes any excess product, and melds the product with your skin, giving it a natural skin-like texture. Make sure to buff under your eyes, over your eyelids, and around your hairline to blend the product into the tight borders surrounding these areas. Keep buffing until the foundation starts to feel a bit tacky.

    10. Apply any cream face products now

    Apply any cream face products (blush, highlighter, contour, etc.)

    11. Let your foundation set

    This step is crucial. Let the foundation set for 3-5 minutes. Take a tissue, and blot all over your face, avoiding the nose if you have large pores. Pay special attention to the eyelids, lines under the eyes, and the corners of the eyes (where excess product will definitely have creased and collected). If your foundation tends to set into your smile lines, you may wish to buff very lightly over this area once more using the same brush as before.


    12. Apply loose powder with a puff

    Apply loose powder with a puff, rolling and pushing it into the skin.

    13. Finish with any other powders and blend

    Apply any other powder products (blush, bronzer, contour, etc.), and blend well.

    This may seem a tad complicated, but ignoring the setting times, this whole thing takes 5-7 minutes at most, and results in smooth, even, porcelain skin.

    If you wish to sheer down this application even further, dampen your brush slightly before application to prevent excess product from being absorbed by the bristles. Make sure to always use a (relatively) clean brush for application (I tend to wash mine every 3-4 days) to avoid caking. And never forget to set and blot!

    With this quick tutorial under your belt, you’ll always be able to put your best face forward.


    Friday, 7 October 2011

    Tuesday, 27 September 2011

    A Make-up Transformation !


    I CAN'T believe makeup does all of this! Notice how she looks WITHOUT makeup! OMG!!!